 Complete User Instructions for your Extreme Lights Cycle Light
-
Safety Information
- Battery
- Operation
-
Operating your Light
- Charging your Battery
- Mounting Instructions
- XP Quick Release Mount
- O-ring Mount
- Battery Mount
- Changing Modes
- Battery Level Indicator
- Use & Care
-
Performance – Endurance
- Light Output & Runtimes
- Mode & Beam Distance
-
Performance – Core
- Light Output & Runtimes
- Mode & Beam Distance
-
Technical Specifications
- Endurance Cycle Light
- Core Cycle Light
- Trouble Shooting
- Warranty Information
![]()
Mountain bikers take part in the annual TransBaviaans 2016 24hr MTB Race, from Willowmore to Jeffreys Bay through the Baviaanskloof Wilderness World Heritage Site, near Patensie, Eastern Cape, RSA
1. Safety Information
Read and understand the information contained in this user guide, and follow all instructions, cautions, and warnings before installing and operating your Extreme Lights Cycle Light. Improper use of the Cycle Light could lead to fire, leakage or explosion. Always follow the safety Instructions below:
1.1. Battery
- The Cycle Light uses a lithium-ion battery pack. If a battery has discharged, always charge the battery to full capacity before placing the battery in storage. Storing a discharged battery may damage the battery.
- If a battery is being charged, never leave the battery and charger unattended.
- If the Cycle Light is not being used for a long period, charge the battery to full capacity before disconnecting the battery charger and removing the battery from the light unit. This will extend the lifespan of the battery.
- Do not connect non-approved battery packs to the light unit. Battery packs which are not approved by Extreme Lights can cause damage to the light unit.
1.2. Operation
- Do not operate the light unit in conditions of low airflow (such as indoors, or while stationary for long periods) as this may cause the light to overheat.
- When using the light unit, handle it with care as the light may become hot.
- Do not drop the light unit or the battery pack onto hard surfaces.
- Never look directly into the light beam. High-intensity LED light may cause temporary blindness.
- Do not allow children to handle or operate the light unit, battery pack or battery charger.
- Never submerge the light unit, battery pack or battery charger in water.
- Never let children operate the light.
2. Operating your Light
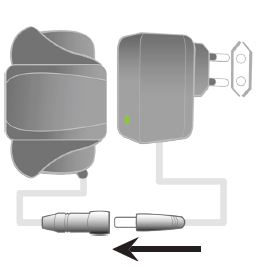
2.1. Charging your Battery
Charge the battery pack as follows:
- Plug the battery charger into a 220V AC mains outlet. Turn on the mains switch.
- Connect the charger outlet to the battery pack. A typical charge time is 6 (six) hours.
- Read the LED indicator on the battery charger as follows:
- RED: battery is being charged
- GREEN: battery is fully charged. Alternatively, the battery is connected to the battery but is not receiving mains power.
2.2. Mounting Instructions
The Extreme Lights Cycle Light fits all sizes of bicycle handlebars.
2.2.1. Mounting the light unit with an XP Quick Release Clamp
- Insert the rubber shims into the holes in the clamp. Most 32mm mountain bike handlebars will use the thin rubber shims.
- Tighten the screw that attaches the clamp to the light unit. Do not overtighten!
- Place the light unit on the top surface of the handlebar, facing forward.
- Tighten the skewer to the desired length. Close the skewer.
- Ensure that the light unit is secured to the handlebar so that it cannot move. This ensures that the light beam will give maximum illumination while riding. if the light unit still moves, open the skewer, turn the skewer clockwise by one full turn, before closing again.
2.2.2. Mounting the light unit with an O-ring bracket and O-rings
- Place the light unit on the top surface of the handlebar, facing forward.
- A large mounting O-ring and a small mounting O-ring are included in the kit. Choose the O-ring that best suits the size of your handlebar.
- Loop the mounting O-ring around the rear holding tab on the light unit mounting bracket. Pull the O-ring under and around the underside of the handlebar, and loop the O-ring around the front holding tab.
- Ensure that the light unit is secured to the handlebar so that it cannot move. This ensures that the light beam will give maximum illumination while riding. If the large mounting O-ring allows the light unit to move on the handlebar, install the light unit using the small mounted O-ring.
2.2.3. Mounting the battery pack
- If you are not using the Extension Cable (optional), mount the battery pack to the topside of the handlebar stem. The Extension Cable can be used to mount the battery pack almost anywhere on the upper parts of the bicycle.
- Choose a safe location for the battery pack. The battery pack must not be exposed to rotating parts or to water, and must not interfere with the motions of riding. Good mounting points for the battery pack are on top of the stem, or the underside of the frame top tube.
- Loop the attached Velcro strap around the chosen mounting point to secure the battery pack in place.
2.3. Changing Modes
Extreme Lights Cycle Lights has four lighting modes. Select a lighting mode as follows:
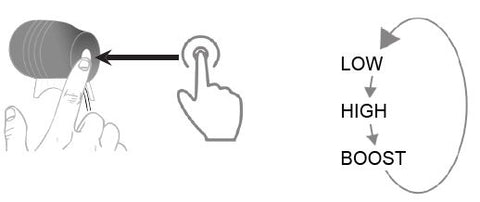
- Press the button on the back of the light unit (shown above) for three seconds to switch the light ON.
- The default light setting is Low mode. Press the button once to select High mode. Press the button again to select Boost mode. Press the button again to cycle the light back to Low.
- To select Pulse mode, double-click the button on the back of the light unit. Pulse mode can be selected while the light is at any light setting.
- Press the light at the back of the light unit for three seconds to switch the light OFF.
2.4. Battery Level Indicator
Extreme Lights Cycle Lights are equipped with a battery level indicator light inside the mode button. The indicator light will display the percentage of battery life remaining, based on colour.

Flash red twice – Light and battery are connected
- Green – 66% to 100% battery power remaining
- Yellow – 33% to 66% battery power remaining
- Red – 0 to 33% battery power remaining
2.5. Use & Care
Always follow the instructions below when using, cleaning and maintaining Extreme Lights Cycle Lights.
- Only use a clean, damp cloth to clean the light unit and the battery pack.
- If cleaning your bicycle with a high-pressure cleaner, remove the light unit and the battery pack from your bicycle.
- Do not use the battery charger in damp or wet conditions, as this could damage the charger and battery pack, or cause an electrical fire.
- If using the Cycle Light in wet riding conditions, dry the light unit and battery pack naturally in a warm room after riding. Do not dry the light unit or battery pack using a heat source.
- Always recharge discharged batteries before storage. Storing discharged batteries may destroy their ability to hold a charge.
- If the Cycle Light is not to be used for long periods, disconnect the battery from the lighting system, fully charge the battery, and store it in a cool place.
3. Performance – Endurance
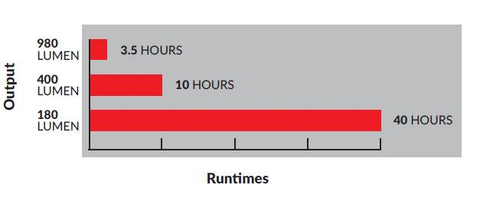
3.1. Light Output & Runtimes

The Chart above displays the expected lumen output and runtimes of each mode.
Actual lumen and runtimes can vary up to 10%.
3.2. Mode & Beam Distance

The chart above displays the modes and beam distances of each mode.
Beam distances are measured according to the ANSI FL-1 standard
4. Performance – Core
4.1. Light Output & Runtimes
The Chart above displays the expected lumen output and runtimes of each mode.
Actual lumen and runtimes can vary up to 10%.
4.2. Mode & Beam Distance

The chart above displays the modes and beam distances of each mode.
Beam distances are measured according to the ANSI FL-1 standard
5. Technical Specifications
5.1. Endurance Cycle Light

5.2. Core Cycle Light

6. Trouble Shooting
If your Extreme Lights Cycle Light malfunctions or fail to operate, follow the steps in this section to identify and resolve possible problems.
The light does not work:
- Connect the battery pack to the light unit. Ensure that all wiring connector plugs are fully seated.
- The LED indicator on the light unit should flash red twice. If it does not, charge the battery pack as described in this manual.
If the step above has been followed but the light still does not work:
- Press and hold the light switch for at least 2 (two) seconds to switch the light unit on.
- If a replacement battery pack is available, fully charge and connect the replacement battery pack to the light unit. If the light unit now functions, the original battery pack is faulty.
The battery is connected to the battery charger but the charger’s LED indicator remains GREEN:
- Check that the battery charger is connected to a 220V AC mains plug and that the mains plug is switched ON.
- If the charger’s LED indicator still remains GREEN, the battery pack is fully charged and ready for use. Switch off the charger and disconnect the battery pack.
Battery life seems shorter than expected:
- Fully charge the battery pack as described in this manual.
- If a battery pack is fully charged but does not seem to be giving its best performance, check the following:
-
Is the battery more than 3 (three) years old?
Many lithium-ion batteries older than 3 (three) years may need replacement. -
Has the battery been stored without being fully charged?
This has a negative effect on the battery.
-
Is the battery more than 3 (three) years old?
If you are experiencing any problems with your Extreme Lights Cycle Light, please e-mail or call Extreme Lights for assistance. Give as much detail as you can, so we can assist you in the best possible way. Do not disassemble any part of the light unit or battery pack as this will void the product warranty.
7. Warranty Information
This product comes with a 12-month warranty which comes into effect on the date of sale.
Please note that in respect for the Product, Extreme Lights does not provide any warranty against normal wear and tear, and against any loss, damage or injury caused by modifications or alterations which are not approved in writing by Extreme Lights,use and/or maintenance that deviates from instructions given in this manual, accidents, accidental or deliberate misuse, negligence or mishandling. Unless expressly stated in the terms and conditions of this Warranty, Extreme Lights shall not be liable for direct, indirect, incidental, or other types of damages arising out of, or resulting from the use of this Product.
This Warranty is in lieu of all other warranties, express or implied, including, but not limited to, implied warranties of merchantability or fitness for particular purpose.