Hi3 Installation On A BMW Motorcycle By Roodt Griesel From West Coast Parts
 Roodt Griesel from West Coast Parts in Tableview has put together a quick and easy Installation Guide for the the Hi3 Motorcycle Lights. He was kind enough to share it with us, so we can share the Guide with you.
Hi3 Spotlight Wiring Installation
Lumen spotlights are nifty, state of the art bike spots. The Hi3’s offer 15% power, 100% power and flashing modes. 15% can be used in conjunction with Low-Beam at night, and flashing mode is ideal for event marshaling on bikes.

How does the Hi3 wiring work?

Black is earth (-). Connecting red to the battery (+) activates strobe mode. Combining Green and red activates 15% power, and combining red and purple activates 100% power. Red, green and purple can be connected simultaneously for 100% power. Test the unit’s operation before installation to see how they work.
Direct Wiring
The Direct wiring method can be used when you don’t require the 15% or flashing modes. Combine red and purple wires to have 100% output. Solder these to the positive (+) High beam plug fitting on the H7 globe at the rear of the light housing. Connect the black wire (-) to the negative wire in the plug fitting on the H7 globe.
Install a Relay and Handlebar Switch to explore the full potential of this light.
This installation method has been proven on an R1200GS and F800GS but will work on almost all BMW bikes and most other bike brands with CanBus (and without).
You will need: 2x Hi3 LED Spots Spot mounts that will work on your bike 1x 4 Pin Relay (5 Pin will also work) 1 x Motorcycle Handlebar Light switch 1 x 20A fuse holder and fuse (blade type will work best) 1 x Quick Splice Wire Connector 2 x Insulated Female Bullet Crimp Cable Connectors 4 x Fully Insulated Female Red Spade Crimp Cable Connectors +- 2m single electrical wire to connect all Cable ties – a few to secure loose wires

Full installation will achieve the following:
- Bike ignition on – spots on 15% power
- Hi-Beam from OEM Handlebar – spots on 100%
- Toggle Switch – activated on Low Beam – Strobe
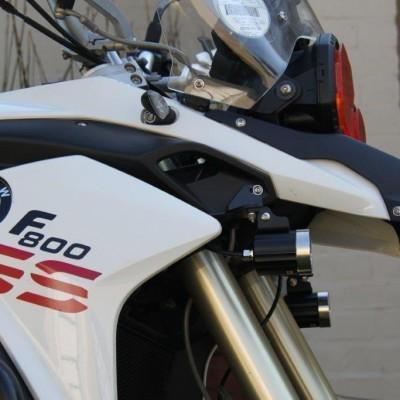
- First, mount the Hi3 lights on the bike. This will help to determine cable lengths.

- Mount the handlebar switch on the LHS handlebar, as close to your left-hand switchgear as possible for easy operation.
- Find a suitable place to mount the relay - near the battery is usually a good place. Make sure that the relay and wiring are installed clear from steering movement.
- Remove the female plugs from the Hi3 lights and solder the corresponding black, red, green and purple wires together after measuring the correct lengths for installation. The F800GS required for one long and one short connecting lead.

- Now start connecting wires to the relay. The blades on the relay are numbered: Relay #30 – connects to fused wire from the positive (+) terminal on the battery.

- Relay #85 – Earthed to bike or battery.
- Relay #87 – connect to the red wire from Hi3 and one wire from handlebar switch.
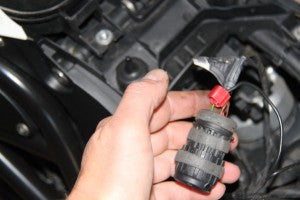
- Connect green wire from Hi3 to other wire from handlebar switch
- Purple wire from Hi3 to positive (+) high beam wiretapped from bike headlight plug
- Relay #86 – “Switched Power”: Tap into the green wire with the blue stripe from diagnostics plug (located under the seat on most BMW models).

- On the BMW F800GS, the relay was cable tied to wires close to the negative battery pole

- Test your setup, cable tie loose wires and close up. Enjoy your lights! 15% can be used for night time driving without upsetting oncoming motorists, and 100% is an absolute blast!


